For most bloggers, the idea of adjusting the coding of their blog to improve the user experience is daunting at best and often quite frightening. HTML5, CSS, and other coding elements are their own virtual language and for the average Blogger user looking to update a personal blog, the automatic settings are about as good as it gets. What if there was a better way to code a blog, whether a beginner or a pro, that could be done within the browser itself?
If you're using Firefox or Chrome, then you should also be using Firebug. It allows you to code your website in real time, so you can maximize the UX of your blog in no time at all.
What Firebug allows you to do is see all of those elements that make up a website in real time. Instead of editing and then publishing, you can edit in real time and see updates happen, all without affecting the user experiences of visitors that are coming to your site while you're editing. You can change the fonts, colors, or virtually anything else within the design of the site quickly and see the results of your work as it happens. Don't like it? Just undo your changes.
It's really that easy.
To download Firebug and get more details regarding its powerful features, visit: Firebug for Firefox, or if you are using Chrome, get the Firebug Lite app. I would recommend to use Firefox, which is more complete and quick, but, nevertheless, both work the same.
Once Firebug is installed, a small bug icon will be available in the upper right of your Web browser's address bar. Clicking it, a horizontally split screen will be shown at the bottom of the browser's window. The page will continue to show in the upper half, while the lower half will show the HTML of the current web page.
To customize any web element from a Blogger template, just click either on the Firebug icon in the toolbar, or the "Inspect Element with Firebug" item in the context menu. Next, click the blue cursor button to Inspect and place the cursor right over the element to customize.
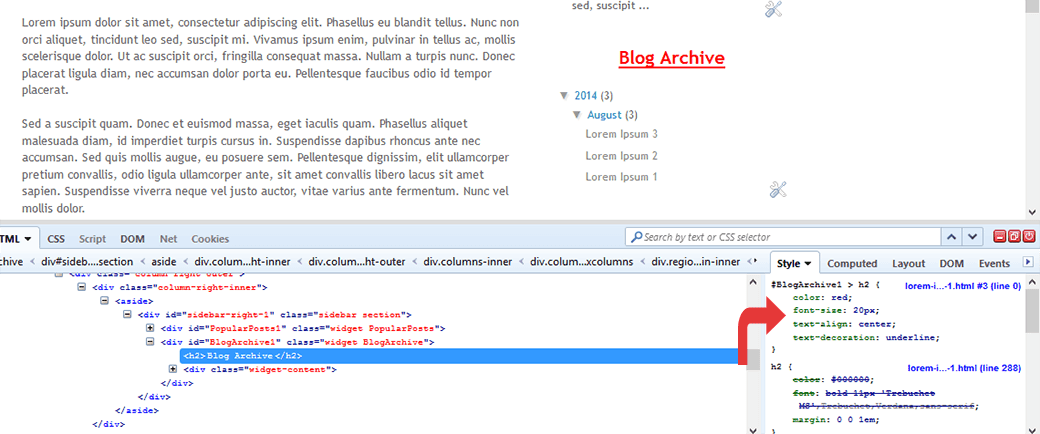
For example, let's say that we want to change the title of the "Blog Archive" gadget. After we clicked the inspect button, mouse over the "Blog Archive" title which will be highlighted as shown in the screenshot below. To change this element, click on it:
Now that we decided which element we want to change, right click on the "Style" panel and select the "Add rule" option:
This will give the class or the id of the highlighted element - in our case, the heading of the Blog Archive (#BlogArchive1 > h2). To edit this rule that we just added, click anywhere near the left curly bracket that will open a text box, so that we can type a new CSS declaration:
And here comes the fun part. Let's say that we want to make the title red. We will type color and hit Enter, then we will type the color value or the red text and hit Enter. We will also set the set the font size to 20px, text alignment to center (text-align: center) and make the text underlined (text-decoration: underline):
The cool thing about Firebug is that when modifying any CSS property, you can see the results directly applied on the page. So, after adding these declarations, we'll see a big red underlined title for our Blog Archive gadget (see in the screenshot above).
To apply this CSS rule on a Blogger template, just select it beginning from the right curly bracket and to the #(id) or .(class) symbol, then right click it and Copy the CSS code.
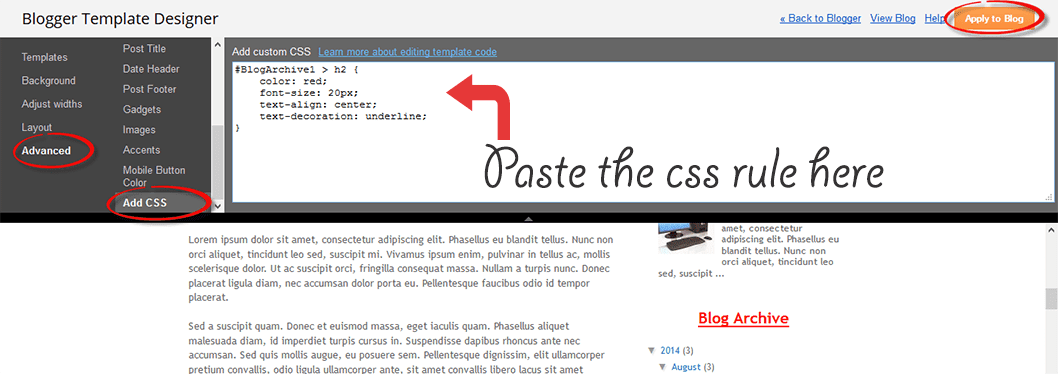
Before making any change, it's highly recommended to make a backup of your current template. Go to "Template" and click the "Backup/Restore" button on the upper right side. On the same "Template" location, click on the "Customize" button and navigate to "Advanced" > "Add CSS". Paste the CSS rule that you just copied into the CSS box:
Click the "Apply to blog" button on the upper right corner to save the changes and view your blog.
From there, all you've got to do is change the coding to make the design elements work under the rules of your own custom.css. This means you can make easy design changes to your Blogger blog without having to go through all of the menus and editing functions so that your template can truly be your own. Do you have some work to do? Sure - but Firebug does all of the primary work for you.
All you've got to do is have a creative mind and a few minutes to make changes to the coding design. Whether you've been coding for years or are just starting your first blog, this is definitely the best way to make sure that your visitors have the best experience possible!
If you're using Firefox or Chrome, then you should also be using Firebug. It allows you to code your website in real time, so you can maximize the UX of your blog in no time at all.
You No Longer Need To Edit Through Blogger!
If you've ever tried to update a Blogger theme through the editing functions of the website, then you know how difficult it can be. You can preview your designs, but you can't save any changes to officially see what is going to happen with your site until you publish the edits. If you've missed just one line of code or forgotten one small element, you're going to have to go back into the editing matrix, find the error, update it again, and repeat until you have a responsive blog once again.What Firebug allows you to do is see all of those elements that make up a website in real time. Instead of editing and then publishing, you can edit in real time and see updates happen, all without affecting the user experiences of visitors that are coming to your site while you're editing. You can change the fonts, colors, or virtually anything else within the design of the site quickly and see the results of your work as it happens. Don't like it? Just undo your changes.
It's really that easy.
Using Firebug to Customize CSS in Blogger
This guide will show you how to modify the CSS code of a Blogger template. Usually, the Blogger Template CSS style declarations are editable through the style.css file, found between the <b:skin> and </b:skin> tags.To download Firebug and get more details regarding its powerful features, visit: Firebug for Firefox, or if you are using Chrome, get the Firebug Lite app. I would recommend to use Firefox, which is more complete and quick, but, nevertheless, both work the same.
Once Firebug is installed, a small bug icon will be available in the upper right of your Web browser's address bar. Clicking it, a horizontally split screen will be shown at the bottom of the browser's window. The page will continue to show in the upper half, while the lower half will show the HTML of the current web page.
To customize any web element from a Blogger template, just click either on the Firebug icon in the toolbar, or the "Inspect Element with Firebug" item in the context menu. Next, click the blue cursor button to Inspect and place the cursor right over the element to customize.
For example, let's say that we want to change the title of the "Blog Archive" gadget. After we clicked the inspect button, mouse over the "Blog Archive" title which will be highlighted as shown in the screenshot below. To change this element, click on it:
Now that we decided which element we want to change, right click on the "Style" panel and select the "Add rule" option:
This will give the class or the id of the highlighted element - in our case, the heading of the Blog Archive (#BlogArchive1 > h2). To edit this rule that we just added, click anywhere near the left curly bracket that will open a text box, so that we can type a new CSS declaration:
And here comes the fun part. Let's say that we want to make the title red. We will type color and hit Enter, then we will type the color value or the red text and hit Enter. We will also set the set the font size to 20px, text alignment to center (text-align: center) and make the text underlined (text-decoration: underline):
The cool thing about Firebug is that when modifying any CSS property, you can see the results directly applied on the page. So, after adding these declarations, we'll see a big red underlined title for our Blog Archive gadget (see in the screenshot above).
To apply this CSS rule on a Blogger template, just select it beginning from the right curly bracket and to the #(id) or .(class) symbol, then right click it and Copy the CSS code.
Before making any change, it's highly recommended to make a backup of your current template. Go to "Template" and click the "Backup/Restore" button on the upper right side. On the same "Template" location, click on the "Customize" button and navigate to "Advanced" > "Add CSS". Paste the CSS rule that you just copied into the CSS box:
Click the "Apply to blog" button on the upper right corner to save the changes and view your blog.
Firebug Also Gives You One Distinct Advantage...
One of the best reasons to install Firebug into Chrome or Firefox is that it allows you to emulate some of your favorite website designs quickly and easily. Instead of hiring a web designer to do the work, which could cost you thousands, you can simply start Firebug and see what the CSS styles are for your favorite site. This allows you to create a similar widget.From there, all you've got to do is change the coding to make the design elements work under the rules of your own custom.css. This means you can make easy design changes to your Blogger blog without having to go through all of the menus and editing functions so that your template can truly be your own. Do you have some work to do? Sure - but Firebug does all of the primary work for you.
All you've got to do is have a creative mind and a few minutes to make changes to the coding design. Whether you've been coding for years or are just starting your first blog, this is definitely the best way to make sure that your visitors have the best experience possible!


ConversionConversion EmoticonEmoticon